Managing Your Leads
Cleaning Up Call Lists
Often the most tedious process of managing a leads list is the process of removing old, stale leads. There are a number of reasons why one would want to remove a lead from a call list, and this software offers the option to remove leads based on the two criteria – the status of the lead and the number of calls placed
Purging Leads by Status
The status of a lead is automatically assigned and updated through one of four factors – the priority of a lead, what happened during the most recent contact, and how long has it been since the last contact. A couple of examples that determine the lead status:
- If an appointment has been scheduled the lead is labeled a “Hot Lead”
- New leads that have never been called and have a priority “1” ranking are considered “Warm Leads”
- All other leads that have never been called are considered “New Leads”
- Leads that have been called at least once either no appointment has been scheduled or the lead hasn’t been labeled, “not interested at this time” or “not a good fit” are considered “Active Leads”
- Leads that have been contacted and the response by the owner is “not interested at this time” is considered a “holding lead” for the next 6 months. After that, it automatically becomes an “Active Lead”
- Leads where the only way to get in touch with the business owner is through email and have been labeled “Email Requested” is labeled “Email Requested”
- If a lead was sent an email it is labeled as a “Follow Up” Lead for two weeks. After that it becomes an “Active Lead”.
- If a lead is not a good fit it is labeled as a “Dead Lead”
Lead status can change based on appointment results as well. Depending on the appointment result the status of a lead can change. A couple examples are:
- When an appointment is the most recent contact with the lead and the result of the appointment is “Not Interested,” the lead changes to “Holding Lead” for 12 months. After that it moves to “Active Lead” again.
- If the prospect “no shows”, the lead is considered a “Dead Lead.”
- If a prospect cancelled the meeting ahead of time, the lead is labeled “Follow Up”
- Reschedules or 2nd appointments are labeled as “Hot Leads”
- “Think About It” results are labeled as “Follow Up” for two weeks.
- “New Sale” results change the status to “Client”
- Other responses are self explanatory
It’s important to note that the lead status can change over time. After 12 months, for example, it’s usually beneficial to reach out to businesses that didn’t buy on the last appointment. This software will update each lead daily, so no manual input is necessary to change the lead status.
Once a lead status is changed to something that makes it undesirable for that lead to be on a call list (the owner isn’t interested, for example), it’s a simple process to remove those leads.
- From the dashboard (homepage), click on the “Clean Up Call Lists” button on the lower right of the screen.

- Find the call list you want to update, and click on the button, “Purge Leads by Status”.
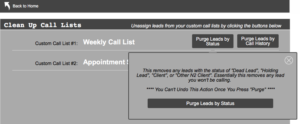
- A warning will pop up letting you know that you can’t undo this action, so be sure you want to clean up this call list. To proceed, click the “Purge Leads by Status” button and wait a few seconds. Done!
Purging Leads by Call History
Often we have businesses that we call over and over again but never get anywhere. It can be frustration to see the same names on our call lists, but since there hasn’t been a definitive yes or no, the lead status never changes from “Active Lead”. So this is where the “Purge Leads by Call History” comes into play. This simply goes through each lead – and based on your criteria – un-assigns any leads that fit that criteria. For example, if you want to get rid of all the leads you’ve called 3 times in the last 30 days, you can do that! Here’s how: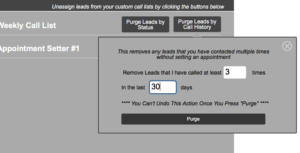
- From the dashboard (homepage), click on the “Clean Up Call Lists” button on the lower right of the screen.
- Find the call list you want to update, and click on the button, “Purge Leads by Call History”.
- A window will pop up with space to enter two numbers. You simply fill them in to complete the sentence: “Remove Leads that I have called at least ____ times in the last ____ days.
- Press the “Purge” button and you’re done!
It’s important to note that nothing will ever delete leads from your database (apart from manually deleting the lead by clicking the trash can icon and confirming that you want to delete it). You are simply removing them from the call list they are currently assigned to. The lead never goes away entirely.
Understanding Magic Lists
“Magic Lists” are groups of leads based on a common element. They are automatically created and updated, so you don’t have to do anything to manage these lists. Magic Lists represent a way to see leads that are relevant to your business without having them in a custom call list.
Lists based on Lead Status
Lead Status is a label assigned by an algorithm in the software. (For more information, see the XXXXXXX section.) Grouping leads based on their status can be very helpful when looking for leads to assign to a call list or to get a sense of the quality of your leads. For example, if your database is mostly “new leads”, then that means most of your leads haven’t ever been called. Time to get busy! If there is a good amount of “Dead Leads” in your database, you may need to reconsider the quality of leads you are adding to the database, since most of them aren’t a good fit.
Magic Lists by Lead Status include:
- Hot Leads – These are any leads with appointments booked and no result has been recorded. (Likely because the appointment is in the future, but sometimes it is because the result hasn’t been updated.)
- Warm Leads – Leads that have never been called and have a priority “1” ranking.
- New Leads - Leads that have never been called
- Holding Leads - Leads that have been contacted with the last 6 months and the response by the owner is “not interested at this time”, or leads that you have met within the last 12 months and the response is “not interested”.
- Dead Leads – Leads that have been deemed “Not a good fit” by you.
- Active Leads - Leads that have been called at least once and don’t fit into any of the other categories.
User-Specific Lists based on call and appointment history
These magic lists are user specific, meaning they factor not only what the lead status is, but who is working with that lead.
- Follow Ups – These are leads where the next action is to “follow up” with the prospect. This could be due to the prospect cancelling an appointment with no future appointment on the schedule, an appointment where the prospect needs to “think about it”, or the most recent call was to record a “sent email”. In any case, these actions are tied to a specific person, which is why “Follow Ups” are user specific.
- Email Requests – While sending emails often provides a poor response from the prospect, there are situations where the last viable option is to reach out via email. Any call where the result is “Email Requested” (and no email has been sent yet) is included into this magic list. It is automatically assigned to the user who made the call.
- Log Appointment Results – It’s easy to forget to record what happened on an appointment, so this magic list puts all of a user’s previous appointments that have an empty “outcome” field in one place. Users can quickly update any missing info to update the database.
- Previously met – This is a running list of all of the user’s previous appointments.
Finding Leads based on a category
Especially helpful when building a call list, finding leads based on a specific category – such as an industry or general location – is simple. After clicking on the button, type in a keyword and press the “Go” button. Any leads with that keyword will be displayed.
For example, any leads where in the “Industry” field you put the words “HVAC” will be displayed when you search for the keyword “HVAC” (no quote necessary when searching). The same goes for location. If in the “general location” field you have the word “North” (representing north of town), a search for “North” in the Location Specific search will bring those leads up.
Finding Duplicates
Duplicate leads are a pain. They create confusion and slow you down. While there are tools in place when adding leads to avoid adding a duplicate business, imported leads or simple mistakes can create duplicate leads that need to be addressed. Here’s how you address them:
- Click on the “Duplicate Search” button to be taken to a custom search page.
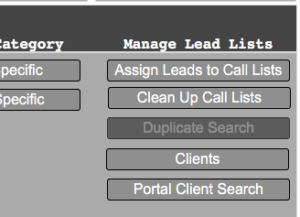
- Click on either “Find Duplicate Names” or “Find Duplicate Phone Numbers” to display a list of duplicates. Either the work phone number matches, or the business name matches.
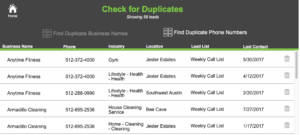
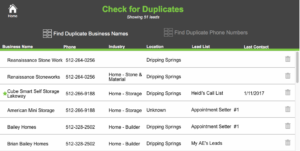
- Click on a lead to bring up the details for that lead, determine which lead needs to be deleted, and press the trash can icon on the right of the list view.
It’s worth noting that duplicate business names can be different companies with the same name, just different locations. Duplicate phone numbers are more reliable, but occasionally some businesses (particularly service industry companies) will advertise different phone numbers (to track phone calls). In this case, checking for duplicate business names provides a good way to spot those.
Clients
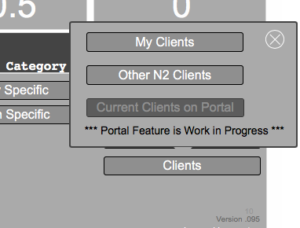
The “Clients” button will give you option to find a list of clients you’ve sold or a list of other N2 clients in your market. Some accounts have the ability to find active clients based on matching phone numbers in the portal, but this service is limited at this time.
Understanding Your Numbers
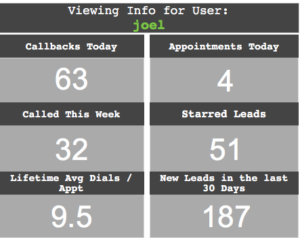
Successful businesses know their numbers, so this software displays the key metrics that are most important when managing your leads. This section is specific to the user, so any user can see their numbers at a glance. If you are the owner of the database, you have the option to change the user for these numbers. This is especially helpful if you have an appointment setter. At a glance you can get a snapshot of their performance. (Just press the “change” button next to the user name. Pressing “view totals” shows the numbers for all users combined.)
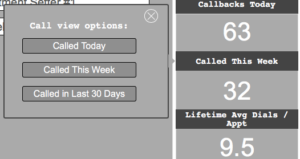
A key number to know is how many calls you’ve made in a given amount of time. This records the number of businesses called based on the time displayed. (The default is for the week.) You can easily change the date range by clicking on the label “Called this week” and selecting the date range you want to view.
Clicking on the number will take you to a list of all the leads called for the selected date range.
Knowing the number of upcoming appointments is helpful, and this software can quickly lookup the number of appointments for the day, week, and next week. By default completed appointments are excluded, but you can toggle them on by pressing the “include completed appointments” button.
Clicking on the number will take you to a list of the appointments associated with the date range.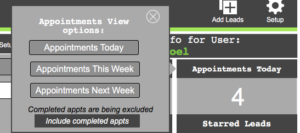
Callbacks
A common response when calling a business is “call me back later” (or some variation, like “call back on Tuesday when the owner is in”). When making calls and selecting a callback date, you can quickly see which businesses you wanted to callback on this day. Clicking on the label can change the date range from today to “this week”, “last week”, or “all callbacks”. Having other date options is helpful in case you missed a scheduled callback. There is an option to include callbacks for businesses you’ve already contacted in case you want to remember who you were talking to for that date range.
Clicking on the number will take you to a list of the callbacks associated with the date range.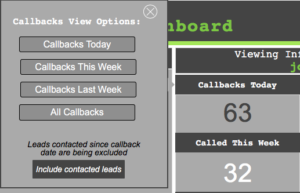
Call Ratio
You call ratio measures your efficiency, telling you how many dials it takes you to generate one scheduled appointment. This number is calculated automatically as you or one of your users make calls, and you can change the criteria from “lifetime” to “Today’s ratio”, “This Week’s Ratio” and “Last 30 Days’ Ratio” to get a sense of trends for the specific time.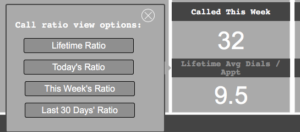
New Leads
It’s important to constantly be adding leads, and this number gives you a quick indication of how many new leads you’re adding. Like the other numbers, you can change the criteria from the last 30 days to “this week” or “today”.
Clicking on the number will take you to a list of the new leads added within the date range.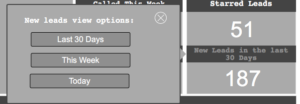
Working with Hash Tags, Starred Leads, and Custom Searches
The more leads you accumulate, the more important it is to quickly sort through them to find what you are looking for. This section is designed to offer some tools and strategies to easily get to the leads you want without much effort or data entry.
Quickfind and Search Options
There are two primary search options. The first, and most convenient, is the Quickfind feature.
On many pages you’ll see a magnifying glass with the word “Quickfind” under it. Clicking on the icon will bring up a search field. Type a word, a number, or anything else and press the magnifying glass icon next to the field to search the database for whatever it is you typed in the search field.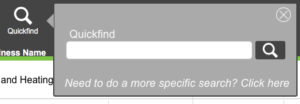
The way Quickfind works is that it looks through all of your leads and most of the fields to find a match. For example, if you searched for the word “Kim” in Quickfind, the software will go through each lead and look for the work “Kim” in every field. If there’s a “Kim” in the primary contact field then that lead will be displayed. Same if “Kim” is in the general comments field, Call History notes, appointment notes, etc.
Quickfind is great for general searches, but being so general it can sometimes display more results than you want. If you want more control over your search, you need to do a specific search.
Using the Custom Search Feature
From the Quickfind pop-up, click on the text that says, “Need a more specific search? Click here”. This brings you to a page with LOTS of search options. The idea here is to limit your keyword search to a specific field or fields. If we know the contact person we’re looking for is “Kim”, we would click on the “Detailed Info” button, find the “contact name” field, and type “Kim”. Pressing Search on the right side of the screen will initiate a search for any lead where the word “Kim” is in the “contact name” field and display them below.
Custom Search with Multiple Criteria
The “Search Leads” screen supports multiple criteria searches. Continuing our “Kim” example, if we wanted to look for leads where the contact person is Kim and we contacted them in the last month, we’d put “Kim” in the contact name field, but we’d also click on the “Call Info” button and in the “most recent call” fields put a range of dates for the last month. Pressing search now initiates a search where the contact person has the word “Kim” in it AND the most recent call is between the two dates specified.
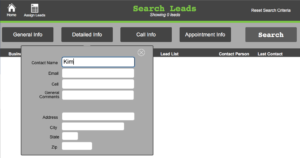 There’s no limit to the criteria you can enter when using the “Search Leads” page, but keep in mind the more specific the search, the more specific your results. Get too specific and your results will dwindle. If you want to reset the criteria, simply click the “reset search criteria” text in the upper right corner.
These types of searches can be great to find numbers not usually displayed. For example, say we wanted to know how many “think about it” responses we’ve gotten in the last 60 days. To find out, we’d click the “appointment info” button, enter a date range for 60 days, and select “think about it” in the outcome field. Press search and the number of leads that show up is our answer. (The number of found leads is under the “Search Leads” title in the top middle of the screen.)
As a general rule, the “Search Leads” page is for specific searches, Quickfind is for general searches.
Adding Hash Tags to Leads
Once you understand the power of searches, you can use them to further categorize your leads. A common way to accomplish this is to use hash tags.
Most of us are familiar with hash tags, since we see them often in social media posts. The same technique can be applied to your leads. Below are some examples, but the limit is your imagination:
- If a lead was mentioned by a resident in your community, you could add a #resident or #residentreferred hash tag to the “general comments” field of that lead.
- If the lead does work in a specific neighborhood, tag the lead with #neighborhoodname (whatever your neighborhood name is, or an abbreviation of it. #CH could stand for the “Cherry Hills” community.)
- Business better for cross selling? Tag it with #crosssell
- Business ideal for a combination of neighborhoods that you’ll want to mention? Tag both neighborhoods.
- Is there a time of year you want to call the business? (Perhaps during their low season when it’s easier to get them on the phone.) Tag with a month or season: #summer or #July.
- If you have multiple publications, tag leads with the name of the publication that lead is for. #pubname

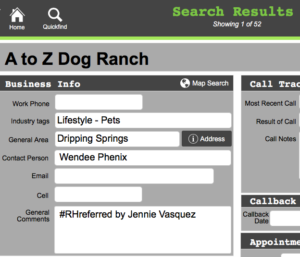 To quickly find a list of all the resident referred leads, simply do a Quickfind search for #residentreferred (or whatever your tag is) and all of the leads will be displayed. Combine this feature with the “assign leads” button at the top of the screen to make call lists that are specific to resident referred leads.
There are a number of ways you can use this to your advantage, but just remember that consistency is key. Once you create a tag, you don’t want to deviate from it. Otherwise your searches will be incomplete since #residentreferred and #referredbyresident are different.
Starring Leads
There are businesses that we don’t want to forget about. We want to make sure they are at the top of our call list and are easily accessible all the time. For these types of leads, there is a special way to label them. To “Star” a lead is to designate them as special, and there are a few implications when we “Star” a lead.
- Starred leads are always at the top of any call list.
- Starred leads are quickly accessed from the dashboard (homepage) by clicking on the number under the “Starred Leads” category.
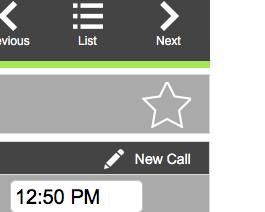
To star a lead, you need to go to the details page of the lead. From a list of leads, click on the one you want to star to bring up the details page. If you are logging calls you are already in the details page. Look for an outline of a star next to the business name. Click the star outline. It will turn solid green. It is now starred. To un-star a lead, click the green star and it will go back to a white outline. That’s it!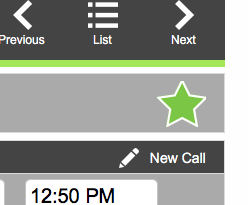
Portal Client Warnings
It’s easy to forget to compare your leads with current clients that you shouldn’t call. Each active client list is usually large, and can be a tedious process to manually compare all the active clients in your area with your leads. Thankfully, this software can do the hard work for you.
This feature is currently in limited rollout.
How Portal Client Warnings Work (where I get the data)
Here’s how the process works. I have a list from the portal of clients that are active and shouldn’t be contacted. Each night, a server compares all of the leads in your database with the leads in that list, and if there is a match, displays a warning. This is a visual indicator that the lead in your database is likely a client, so you can avoid calling them in the first place.
Most of the time this is indeed a current client, but there is the chance of a false positive. So clicking on the "options" button gives you some choices to either:
• Dismiss Warning - It's not actually a current client
• Mark Lead as "Other N2 Client" - It in fact is someone else's client
• Make Lead as "My Client" - This is your client and wasn't labeled as a current client yet.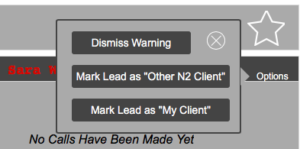
Keep in mind some limitations. The active client list is updated monthly, and leads are checked daily (usually middle of the night) for a match. It is possible then that a brand new client may not be in active client list for a couple of weeks, or a new lead you added that day doesn’t show up as a client (because the server hasn’t checked it yet.)
Finding Current Clients (that aren’t already marked as a client)
From the dashboard (home page), the “Clients” button on the lower right of the screen will pop up an option to find “Current Clients on Portal”. This will look for any potential clients that haven’t already been designated as “My Client” or “Other N2 Client”.